
My First AI Agent Project: Building a Personal AI Research Assistant
A hands-on walkthrough of building an AI agent that searches and summarizes scientific papers using watsonx.ai, LangGraph, and the ReAct framework


In this post, I’ll walk you through how I built an AI agent for a personal project—something simple, practical, and fun.
Recently, I started learning how to create AI agents. As I explored possible ideas, I thought about tasks I often repeat. One of them stood out: searching Google Scholar for research papers. I’d enter a query, skim through results, and narrow down to the most relevant papers. This process felt like a perfect candidate for automation.
So I turned it into an AI agent use case.
👉 View the full code and notebook on GitHub
What This Agent Does
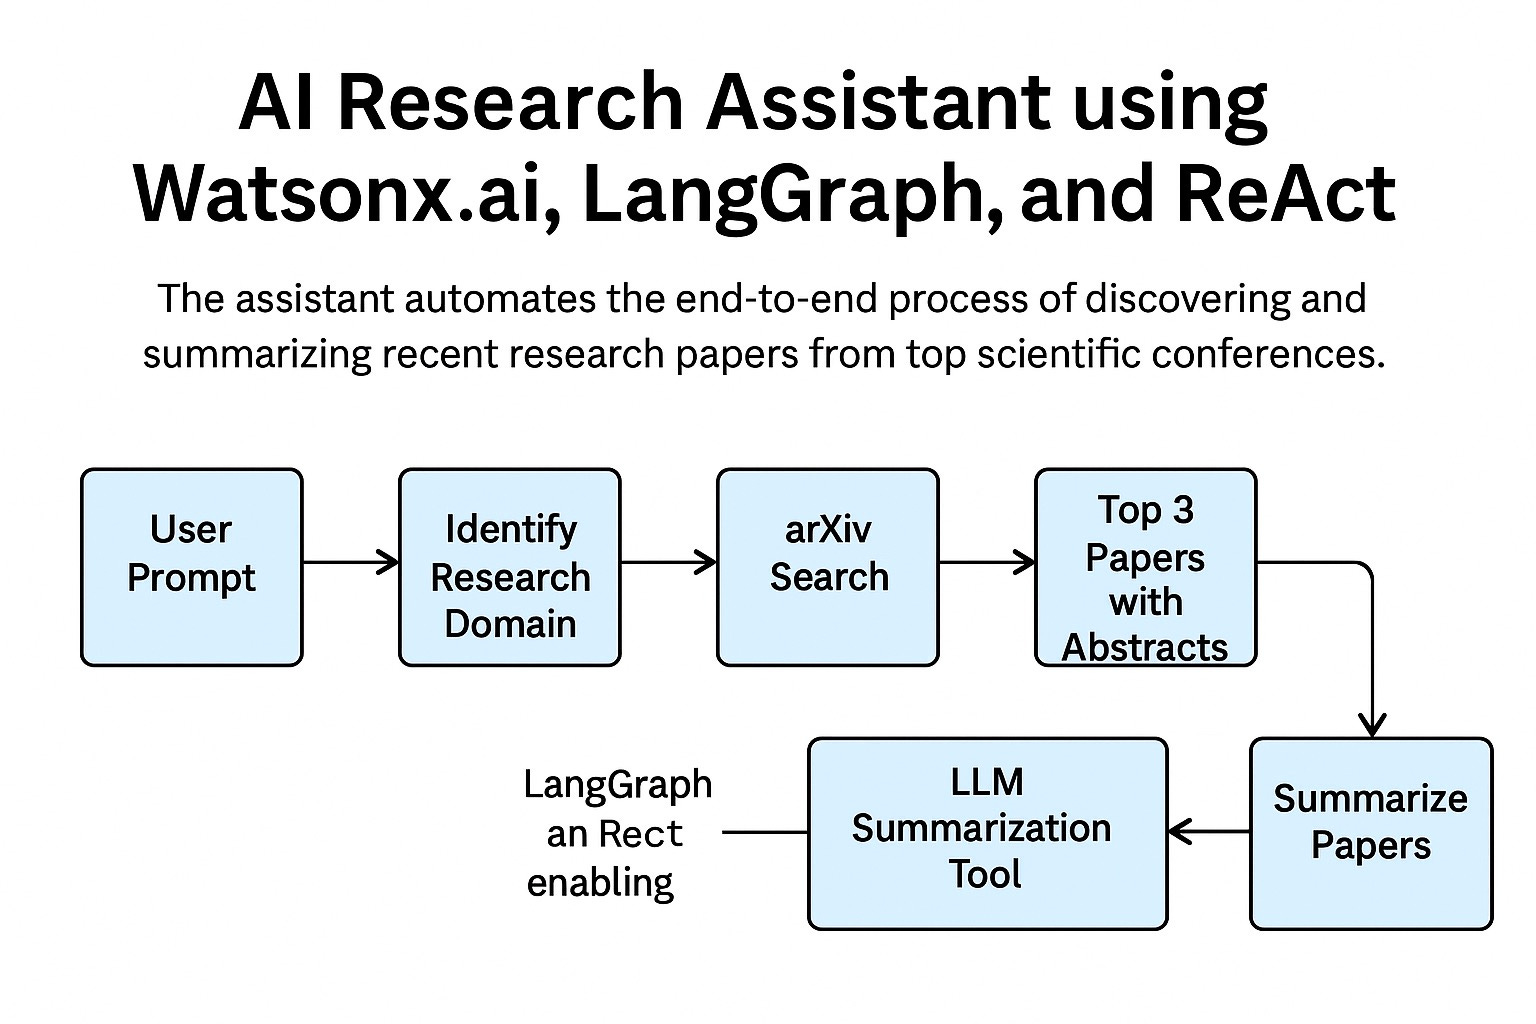
This AI agent helps me find recent scientific papers based on a prompt. It takes my search query, identifies the relevant research domain, pulls top results from arXiv, and summarizes them using an LLM. Here's what it does step by step:
Receives a prompt: I tell the agent what kind of paper I'm looking for.
Identifies the research domain: It maps the query to a field like databases or machine learning.
Searches arXiv: It retrieves the top three relevant papers from recent publications.
Summarizes abstracts: Each paper’s abstract is passed through an LLM (IBM’s Granite model on watsonx.ai) to produce a concise summary.
Returns results: I get a list of papers with short summaries.
It’s not sophisticated, but it works—and it’s a great starting point for anyone learning to build AI agents.
Setup and Tools
I’ve documented the setup steps in the project’s README.md.
📂 GitHub Repository – search-agent
I built the agent using Python 3.12 on a Red Hat Linux machine, but you can easily run it on macOS too. I used:
VS Code for development
uv(a fast and modern Python package manager)watsonx.ai and IBM Granite model for LLM-based summaries
LangChain and LangGraph to orchestrate the agent’s workflow
Environment Configuration
Create a .env file in your project directory with the following keys:
WATSONX_APIKEY=your_api_key
WATSONX_URL=your_watsonx_url
WATSONX_PROJECT_ID=your_project_id
Load these environment variables in your script:
from dotenv import load_dotenv
load_dotenv()
Initializing the LLM
Set up the chat model using IBM's Granite model:
from langchain_ibm import ChatWatsonx
llm = ChatWatsonx(model="ibm/granite-13b-chat-v1", temperature=0)
How the Agent Works
Let’s break down the core logic.
At its heart, the agent uses a React-style pattern—Reasoning and Acting. Upon receiving a user prompt, it thinks, creates a plan, and executes it using tools. It remembers previous interactions and uses those as context in follow-ups.
Tools I Built
Each key function in the workflow is defined as a tool, available to the agent during execution. Here are the main ones:
def identify_domain(query: str) -> str:
    # Maps a search query to a research domain
    ...

def search_archive(query: str, category: str) -> List[Dict[str, Any]]:
    # Calls arXiv’s API to fetch matching papers
    ...

def search_paper(query: str, category: str) -> List[Dict[str, Any]]:
    # Wraps search_archive and formats results
    ...

def summarize_text(text: str) -> str:
    # Sends paper abstracts to the LLM for summarization
    ...
These tools extend the LLM’s abilities, allowing it to perform real actions—not just generate text.
Prompt Engineering
The system prompt guides the agent through every step. It includes strict instructions:
prompt = """You are a research assistant that finds and summarizes real scientific papers using tools.
You must follow this procedure:
1. Always call identify_domain first to determine arXiv category.
2. Then call search_paper with topic and category.
3. Wait for the real tool response before doing anything else.
4. Never fabricate tool responses.
5. If the user asks for a summary, call summarize_text using the actual abstracts from the search_paper results.
6. Do not include paper titles, authors, or abstracts unless they come directly from the tool result.
7. If the tool has not yet returned results, do not proceed."""
This helps the agent follow a clear, deterministic workflow and stay grounded in real data.
The run_agent() Function
This function stitches everything together. It manages the conversation, keeps memory of previous prompts and tool results, and enables a streaming output mode. As the agent executes each step, it prints out intermediate reasoning and tool usage—useful for debugging and transparency.
Here’s how a typical session goes:
run_agent("Find three recent papers on database query representation using transformers since 2024.")
Then I follow up:
run_agent("Can you summarize the papers?")
Because it maintains memory across steps, I don’t need to repeat anything.
Final Thoughts
This was a fun project. I learned how to create an AI agent that doesn't just chat, but thinks, searches, summarizes, and returns results with real value. It’s not just about generating answers—it's about doing something useful.
If you're just getting started with agents, I highly recommend trying something similar. The setup isn’t hard, and the payoff is immediate.
👨💻 Try it yourself: GitHub repository with code and instructions